With the rise in popularity of electric cars, more and more people are considering installing an EV charger in their garage at home for convenient and fast charging of the vehicle.
An EV charger is an electric vehicle charging provider which offers a safe and efficient solution for charging your electric car.
In this guide, we will explore the various steps and tools needed to DIY install an EV charger in your garage.

Index:
- Assessment of needs
– Choosing the best location
– Electrical system assessment - EV charger installation
– Connection to the electrical system
– EV charger connection to the Internet
– Three-phase connection - Why prefer an EV charger to a portable electric car charger
- Testing and maintenance
Assessment of needs
It is essential to consider one’s charging needs before planning the installation of the EV charger. One must consider the charging power required for the electric vehicle, identify the optimal location for the EV charger, check the capacity of the domestic electrical system, and thus choose the EV charger in an informed manner.
To make the right choice, it is important to find out which EV charger model is best suited to your needs. One usually opts for a single-phase EV charger, which is compatible with most modern cars and their integrated 6/7 kW or 11 kW charger. Changing to a three-phase system involves a high cost and is often not an efficient solution in relation to consumption either. So, with rare exceptions, a single-phase 4.5/7.4 kW electric car charger is preferred, depending on requirements.
Remember that for faster and more optimised charging, it is always advisable to install a fully compatible EV charger.

Choosing the best location
Identify a suitable location for the installation of the EV charger.
The best location to install an EV charger should be the garage, close to the electric car park and easily accessible. Ensure that there is sufficient space around the EV charger to allow safe installation and that it is protected from the weather.
Electrical system assessment

Before proceeding with the installation of the electric car charger, it is also essential to carefully consider a few key aspects in order to proceed safely and smoothly.
1. Electrical check-up:
- Qualified electrician: Make sure your home system is ready for charging. A qualified electrician will assess the capacity of the system and recommend possible upgrades to support the desired power.
2. Your home, your way:
- Owner? No problem! If you own the property, you are free to install the EV charger. However, it never hurts to check with your city for any necessary documents or costs.
3. In a condo, some coordination is needed:
- Assigned parking space? Check if there is a designated power line and if it is connected to your energy meter or the condominium meter.
- Tenant? Just speack with the owner. Obtain his consent before proceeding with the installation.
4. Safety and compliance:
- Remember to follow the regulations in force in your country and to check the permission you need to install the electric car charger.
- Electrical plan: If the power exceeds 6 kW, hire a professional for the plan.
Do not underestimate the importance of compliance:
- Guaranteed safety: Protect yourself and your home from electrical risks.
- Insurance without surprises: Avoid problems with your policy in case of accidents.
Remember:
- A qualified technician is an invaluable ally for a professional installation.
- Getting information from your municipality avoids unpleasant surprises.
With a little care and planning, your EV charger will be ready to charge your electric vehicle safely and conveniently.
EV charger installation
Once the preliminary assessments have been completed, it is time to install the EV charger. First make sure to mount the EV charger securely to the wall using the mounting brackets provided.
Mounting an EV charger for charging electric cars and connecting it to the energy meter may seem like a complex procedure, but by following a few key steps you can do the job, DIY, effectively and safely.
In our case, we chose the Wallbox Abb Terra AC. It is a single-phase EV charger that handles up to 7.4 kW of power.

To begin, you will have to open the EV charger box, by using a screwdriver to remove the screws that secure the cover. Once the cover has been removed, you will have access to the inside of the EV charger, where you can proceed with the connection.
Remember to carry out all the operations described below in the absence of power.
Connection to the electrical system
Before proceeding, make sure you have all the necessary materials and components, including:
- the smart energy meter which allows precise consumption data to be obtained in relation to electricity, these devices create the communication network between the various nodes, monitoring the incoming and outgoing energy flows for a utility
- the circuit breaker a safety device capable of automatically interrupting the flow of electric current in an electric circuit in the event of an overcurrent
- the right cables i.e. neutral, live, earth, RS485 data cable


Let’s start by identifying the exact location of the installation, taking into consideration:
– The distance to the energy meter and consequently the length of the wires for connection
– Independence and electrical system security. Remember that it is advisable to install the electric car charger in such a way that each of its elements is inaccessible to unwanted tampering by third parties.
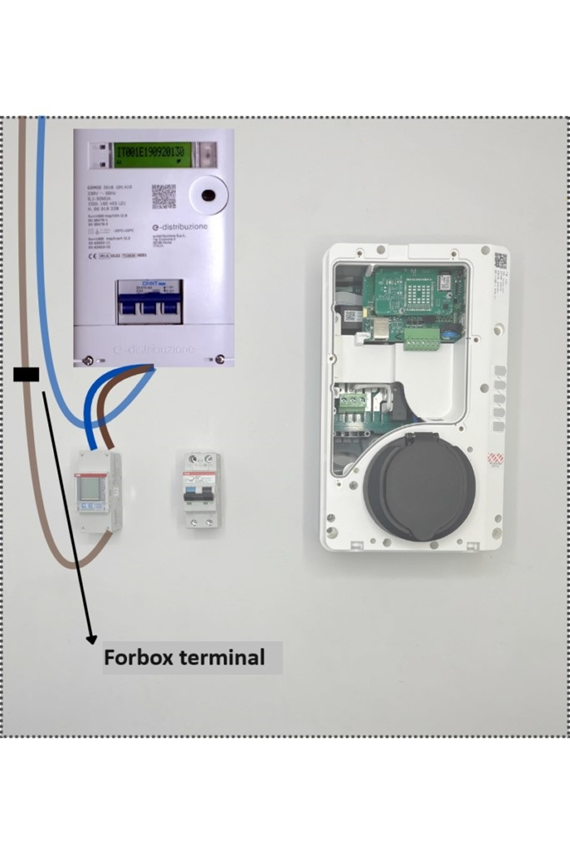
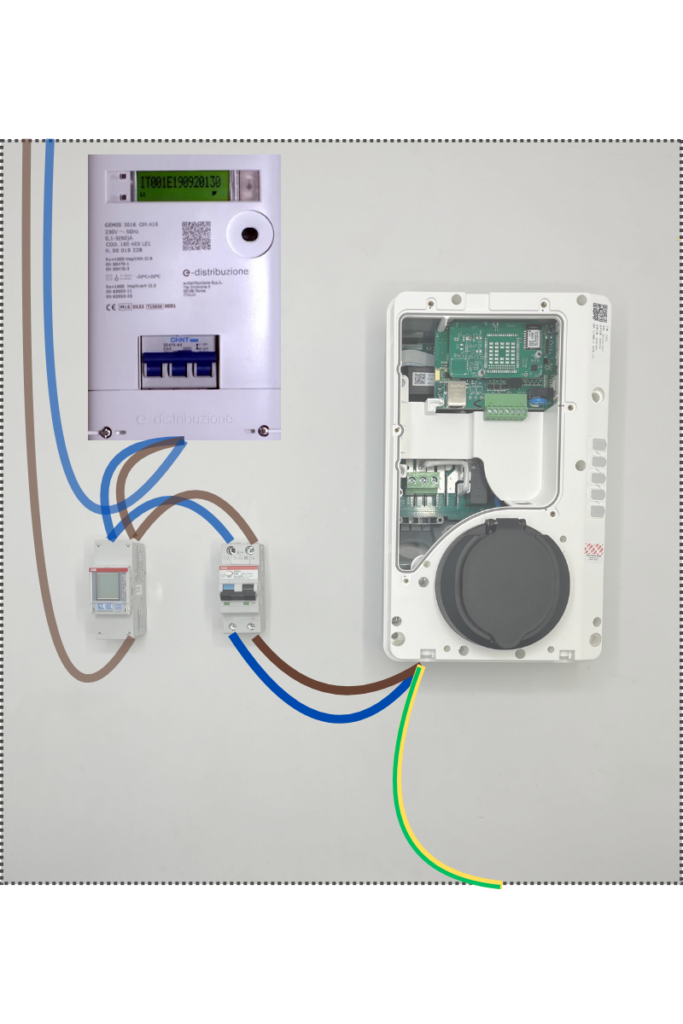
Starting situation
Let us therefore start with the situation you will find when you begin the installation.
Let us then distinguish the wires coming from the home and going to the meter:
- Neutral: Blue wire
- Live: Brown wire

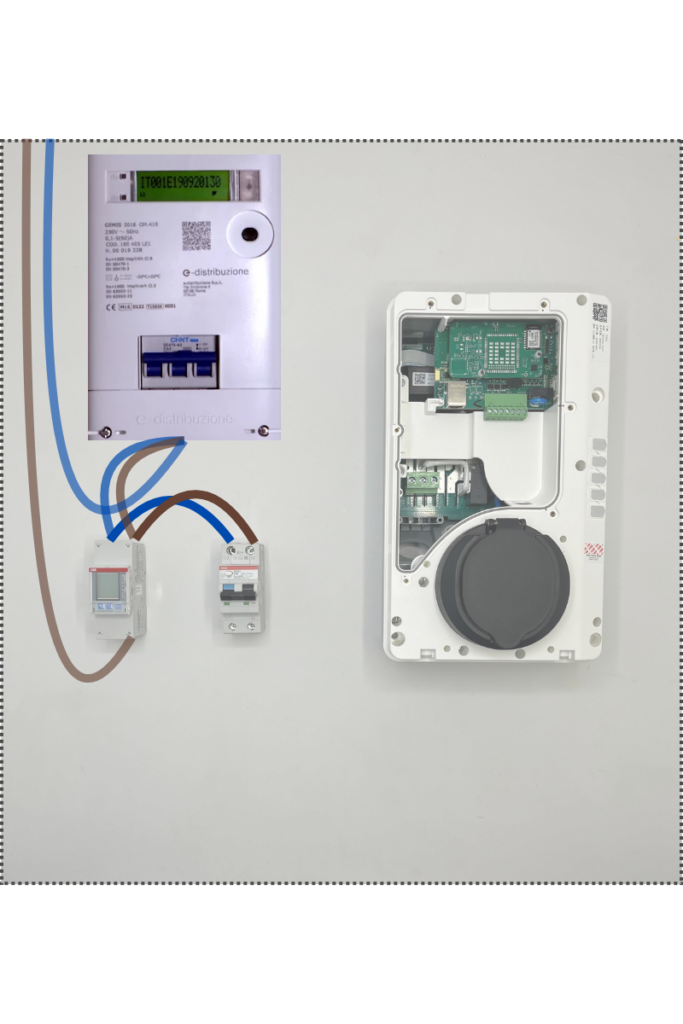
1 – Connect neutral and live wires from the meter to the smart meter
First, we remove the neutral wire from the meter, make the connection with the neutral that will go to the smart meter, as in the photo below, and then reconnect the two neutral cables to the meter at the point where the neutral was originally connected individually.

We therefore also connect the live from the meter to the smart meter.
We now proceed with the live wire, disconnecting the live that we initially found attached to the meter coming directly from the flat.
At this point, using a new live wire, we will make a new connection between the point on the meter where the live cable was initially connected and L input on the meter.

Now, connect the live wire coming from the house to the smart meter by extending it with a new live wire, which will be plugged into the smart meter, from the output marked ‘L’.

A forbox terminal is used to extend the live wire. This connection will allow the smart meter to measure the domestic electricity consumption in real time.
2 – Connect the neutral and live wires with a jumper from the smart meter to the circuit breaker
At this point, it is necessary to create a jumper, that is, to connect the neutral and live wires between the smart meter and the circuit breaker.

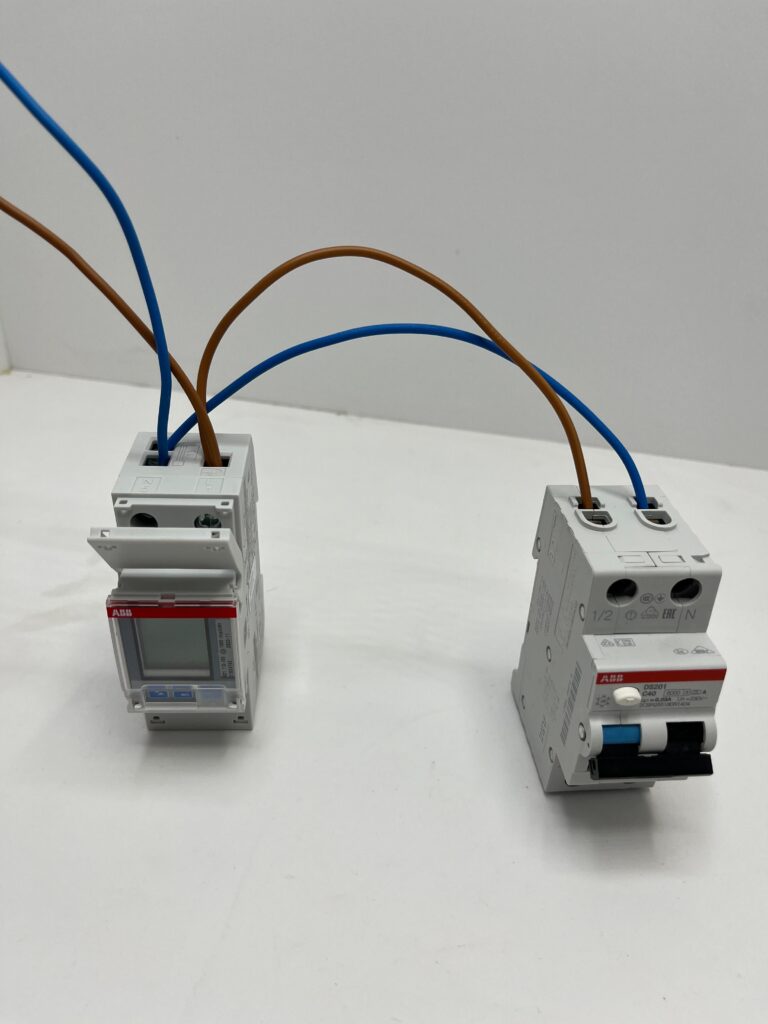
When creating the connection, take care to connect the wires in the correct order as you see in the photos.
– The neutral wire should be connected to the appropriate input of the smart meter, marked with the letter N and the output neutral should be connected to the corresponding input of the circuit breaker.
– Similar procedure for connecting the live wire. In this case we will join the incoming and outgoing live wire from the same terminal, which will start from the smart meter marked with the letter L and will be connected to the respective input of the circuit breaker.

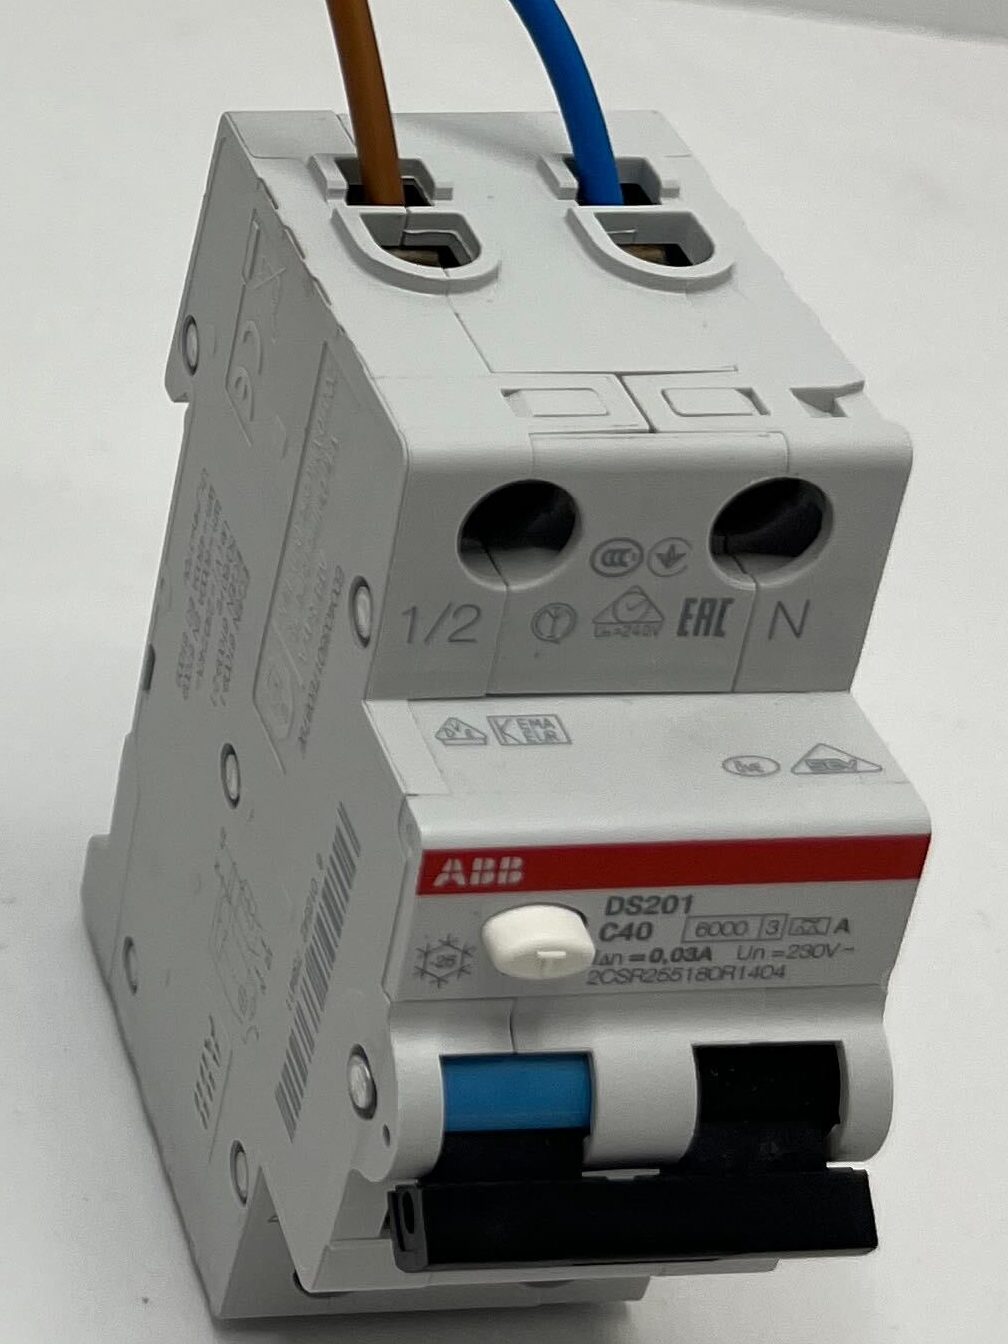
This will allow power to be supplied to the EV charger via the circuit breaker, which will act as a safety gateway, blocking the flow of current in the event of surges or danger.
3 – Connect the wires from the circuit breaker to the EV charger.
The next step is then to remove the protective cap at the bottom of the EV charger and connect the wires from the circuit breaker output to the EV charger.

Specifically, you must pay attention to the following steps:
- Neutral: it goes in the N input
- Live : it goes in the A input


As can be seen in the photo, the installation is completed by the earth wire: yellow and green, which is inserted into the PE input
4 – Connect the EV charger to the smart meter via data wire
The connection in this case is very simple, you just have to pay attention to the order in which the cables are arranged, exactly as in the picture below, therefore starting from the left input:
– First input of the meter houses the cable that will be plugged into the third input of the EV charger
– Second input of the meter houses the cable that will be plugged into the first input of the EV charger
– Third input of the meter houses the cable that will be plugged into the second input of the EV charger
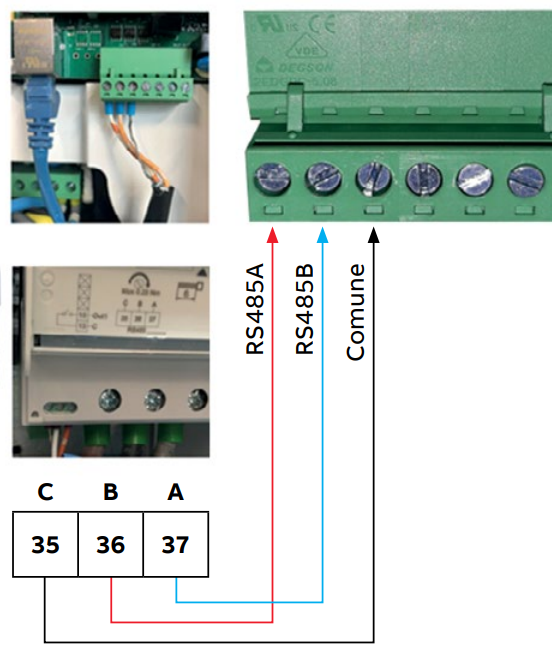
The data cable you see in the picture below is only used as an example. The correct installation is to use the single-phase RS485 cable for max 7.4 Kw.


This connection will allow the EV charger to regulate its use and consumption according to the available energy.
For example, if the maximum energy consumption of the meter is 6 kWh, and the consumption measured by the smart meter in the flat is 3 kWh, by subtraction the EV charger will handle the remaining 3 kWh for its operation.

By carefully following these steps and using the correct equipment, you will be able to correctly mount and connect your EV charger for charging electric cars in your home.
EV charger connection to the Internet
Once the power connection has been completed, it will be necessary to proceed with the connection of the EV charger to the Internet. This step is essential to enable the EV charger to communicate with other devices and manage the charging of the electric car efficiently. Find the RJ45 Ethernet socket on the EV charger and insert the Ethernet cable into the dedicated hole.
If required, insert the Nano SIM card into the slot.

Connecting and managing the EV chargervia App
Once you have successfully connected the EV charger to the internet, you can also connect it to the app to customise the remote control and management settings of the EV charger.
Most modern EV chargers have this functionality, in ABB’s case the app is called ABB ChargerSync APP available for both iOS and Android. Simply create an account and download the app to get access to all the online functionality.
Thanks to this app, you can total control the Terra AC Wallbox, managing and configuring it from anywhere. You can customise the energy cost according to time slots and determine the maximum power level to best suit your needs. In addition, you automatically receive detailed reports on energy consumption.
Three-phase connection
Please note that the Abb Terra AC wallbox whose installation we have illustrated provides a single-phase connection. There is a possibility, however, that you may have chosen a different EV charger that has a three-phase connection.

In this case, the process is identical to that described for the single-phase with the difference that we will have 3 wires, one per phase, as opposed to the single wire, so in addition to before, we will have to insert:
- Phase 1 brown wire goes into the Phase A
- Phase 2 black wire goes into the Phase B
- Phase 3 grey wire goes into the Phase C
Why prefer an EV charger to a portable electric car charger
Installing an EV charger in your garage for recharging your electric vehicle offers several advantages over using a simple home charger, i.e. the portable charger for electric cars that usually comes with the purchase of the vehicle.
The charger is designed to be used in an emergency, or when it is not possible to recharge the electric car at a dedicated charging station or column.
Many, however, use the charger for daily charging of their electric vehicle at home.
Installing an EV charger in your garage for frequent car charging has several advantages, let’s find out which ones.


Here are some reasons to prefer an EV charger:
- Charging speed: EV chargers are designed to deliver higher charging power than domestic chargers. This means that your electric car will recharge faster, reducing the time it takes to have a fully charged battery.
- Safety and Reliability: EV chargers are designed and built to high safety standards. They offer protection against overvoltage, overcurrent and overheating, ensuring a safe and reliable charging experience.
- Additional functionalities: Many EV chargers offer additional functionalities, such as the possibility to monitor energy consumption, schedule charging according to times of advantageous energy tariffs and integrate with home automation and energy management systems.
- Compatibility: EV chargers are designed to be compatible with a wide range of electric vehicles, ensuring efficient and optimal charging for each model.
- Battery life: EV chargers are designed to deliver optimal charging power that helps preserve the battery life of the electric car in the long term. Charging with the correct power and current can help reduce battery wear and extend battery life.
In summary, installing an EV charger offers a safer, faster and more efficient solution for charging electric cars than using a simple home charger, providing a better overall charging experience and longer vehicle battery life.
Testing and maintenance
Once the installation is complete, we finally recommend that you perform a test to make sure that the EV charger works properly and that your electric car can be charged without any problems. Regularly monitor the EV charger to ensure that it functions properly and carry out regular maintenance according to the manufacturer’s instructions.
By following this DIY step-by-step guide, you will be able to correctly install an EV charger in your garage at home, ensuring a convenient, efficient and safe charging experience.