Replacing an intercom system may not seem like an easy task to the inexperienced, but by following our guide it can become a nice challenge to overcome on your own.

It can happen that an intercom breaks down and calling a technician to repair or replace it is obviously the first thing that comes to mind. This, however, lengthens the time of the disruption in our home.
Is it possible, then, to try to solve it yourself? The answer is yes, and the procedure for replacing the intercom can also be quite simple. In this post we will explain the various steps to be followed, step by step, to change the intercom correctly.
Index:
- How to remove the faceplate
- 2-wire or 5-wire: which technology?
- How to replace a 2-wire intercom
- How to replace a 5-wire intercom
- The buzzer
How to remove the faceplate
Once we have decided that we want to replace the intercom on our own, we must first disassemble it to understand its structure. To do this, we have to remove the faceplate: each model is unique and the approach to this operation will have to be different.

We used a Comelit intercom: in this case, as you can see from the photo, all you have to do is press the tab at the bottom with a screwdriver and then pull the faceplate upwards.
For any other intercom, simply consult the instruction manual to find out how to remove it.
2-wire or 5-wire: which technology?
After removing the faceplate, we need to find out what type of technology the intercom we are replacing supports. We can be faced with two types of technology: a two-wire intercom or a five-wire intercom.
It is essential to respect the technology of the intercom to be replaced. In fact, we cannot install a two-wire device in place of a five-wire one (unless we change the entire system, starting with the outdoor push-button panel, but that’s another story) and, similarly, we cannot replace a two-wire model with a five-wire device, although there are exceptions.

Furthermore, a device belonging to the same brand must be installed: a Comelit intercom must be replaced with another Comelit intercom, an Urmet with an Urmet and so on, but even in this case, there are exceptions.
In fact, there are certain situations in which the general advice just listed does not apply, such as for:
- Urmet universal 5-wire intercom. This device can also replace two-wire technology and intercoms of other brands.
- Comelit universal 2-wire intercomcan replace other brands but still with two-wire devices.
How to replace a 2-wire intercom
In this first case, as can be seen from the pictures below, there are actually two wires coming to our internal intercom: these two wires come from the system’s power supply, which is the intermediate step between the outdoor handset and the indoor intercom. In our case the two wires are connected to the terminals named L – L.
This, of course, is not a universal principle.
Intercoms of other brands may have different terminal codes: just follow the connection diagram that you will certainly find in the instruction manual.


In addition, the same dip switch settings must also be adhered to: this is essential for the smooth operation of the new intercom, which must have the same settings as the old one.
If, for example, on the intercom we are replacing we find switch number two turned up, as can be seen in the photo below, we should, in the same way, turn up switch ‘two’ on the new intercom.

This is what is known as intercom programming: it can be different depending on whether it is connected to the concierge, whether there are two intercoms in the house, or depending on other situations that may occur.
How to replace a 5-wire intercom
If, on the other hand, we remove the faceplate of the old intercom and are faced with a system like the one in the photo, the intercom system we are replacing has five wires.

Again, each brand gives a different name to the terminals, and again, just follow the connection diagram in the instruction manual to avoid making mistakes.
In the case of the five-wire system, another fundamental element to consider in order to correctly set up the new intercom is the type of system present on the previous intercom, which can be mechanical or electronic.
What you see below is the switch that transforms the intercom from mechanical to electronic and vice versa: on the new intercom, you must set it exactly as you found it on the old one.
The buzzer

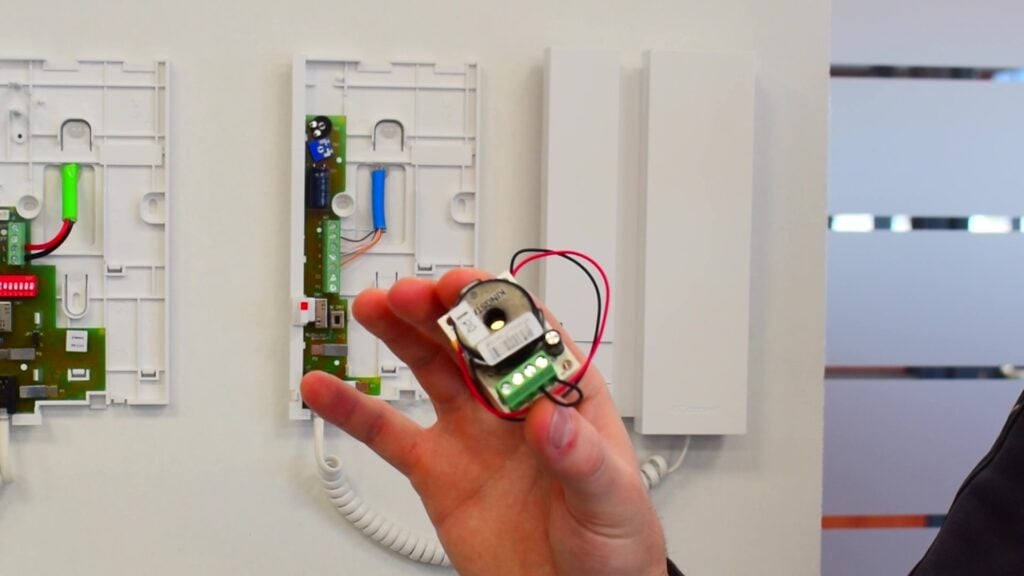
In old intercoms, such as some by Urmet, you may find a slightly different structure.
Some models may in fact have this device inside, which is called a buzzer: if it is present, it means that the intercom is electronic, and consequently the switch of the new intercom will also have to be set as electronic.
As you have seen from reading this short post, replacing an intercom is not as complex as you might think at first, you just need good guidance and initiative. The steps are not too complex, the most important thing, however, is to fully understand the type of intercom present in order to replace it with the right one.
You might also be interested in:
